Fume extraction
Professional fume extraction systems incorporate filters that remove both particulates and gases from the welding fumes, and then return the cleaned air to the workshop. They are portable and feature an articulating arm that can position the vacuum head near the work to effectively capture the fumes before they have a chance to spread. These are great in a production facility, but are too expensive for a hobbyist, especially when starting out.
Since most of the expense of these units lies in the filtration unit, we can compromise and cut costs substantially by exhausting fumes to the outside environment. This may be acceptable if you live in a rural area or your suburban lot is of reasonable size. In a city with densely populated areas you may run into trouble, as your fumes could affect the health of your neighbors.
Let's assume you can build your own fume extraction unit and exhaust to the outside environment without regulatory issues. That means you need three main components:
- Blower or inline duct fan
- Tubing for the vacuum and exhaust
- Means of positioning the vacuum pickup.
The blower should be large diameter and speed controlled to minimize noise and to optimize the air flow to pick up all fumes from your welding without exhausting too much of your warm / cool shop air. Probably the most convenient size is 8 inches, as this provides decent air flow without a lot of noise and the tubing is readily available. Also, adapters can be found for the vacuum pickup and exhaust ends.
Here is an inexpensive in-line duct fan that fits these requirements. It is marketed for controlling greenhouse or grow tent environments and is not rated for smoke or hot air, but for our purposes it should work fine, since we are not exhausting hot flue gases. The Vevor 8 inch in-line duct fan was my choice, and it appears to be a quality piece of equipment. It features a remote control panel that allows fan on/off and speed adjustments.
For the vacuum pickup adapter, I found a 12 to 8 inch duct transition fitting that would provide good surface area for fume pickup and also easily attach to a flexible 8 inch duct. You may prefer a 90 degree register box, since that will eliminate the 90 degree bend in the flexible duct. These may be more expensive and heavier, though, and provide less collection area. The model with the flange might be stronger, and may have fewer sharp edges.
I also found a good deal on flexible 8 inch duct, but those are common and you can no doubt source those yourself. You will have to decide on the length you need based upon your situation, as it can be used both on the vacuum side and pressure side of the inline blower. Smooth 8 inch metal pipe would be more efficient for long runs. Note that you will need extra for the extendable arm, which may vary depending upon the design you choose.
For the exhaust port, assuming you are blowing the fumes through the wall of your shop to the outside, you will need a cover to keep insects and rain out of the system. Here is one that is fairly inexpensive, but it does not have automatically closing flaps. That might be okay, since those flaps can freeze in the winter and block the system, which could be hazardous if you don't notice and your shop becomes filled with fumes.
Finally, you need a way to position the fume extraction vacuum head near your work, and it must be flexible enough to adjust easily to your needs. Many people have tackled this problem with a variety of approaches, and several that seem most promising are the following:
- Articulating arm supported with telescoping tubes
- Articulating arm with locking elbows via scissor struts
- Articulating arm with truss design with elbow plates and springs
- Boom arm with wall mounted swivel bracket.
Option 1 may offer the most robust solution, since the telescoping tubes can handle the most weight at the end of the arm sections. Here is a preformed general purpose tube in three sections that can range from 37 to 100 inches. Note that Testrite Aluminum offers individual parts that will allow you to construct your own telescoping sections to your specifications.
This option still requires you to construct the actual arm, as the telescoping tubes only act as restraints on the swiveling action of the arm. You may need two such arms, one for vertical tilt, and another for horizontal swing. Thus only half the design problem is solved here, and maybe the easy half at that.
The locking elbows for option 2 could be fabricated from steel or aluminum bar stock and easily screwed together, allowing the control of the angle between two duct couplers. This concept is pretty simple but you might be limited with the amount of tension the elbow joint screws can exert on the joint. This could limit the weight of your arm and tubing system. This mimics the design of some professional fume extraction arms, and could be rather complicated.
This video shows how Marcus built an articulated arm fume duct that uses a sandbag filler funnel for the fume vacuum head. This looks cool but those funnels are pretty expensive, and my choice of the 12 to 8 inch duct reducer might be just as effective and about 1/4 the cost. Anyway, his final product turned out great. You can jump to about the 8 minute mark to see how it works.
Option 3 scales up the design of a truss articulated arm found in many desk lamps. This might offer a good balance between rigidity and simplicity, as well as reduced cost if using wood for the trusses and elbow plates. Here is a good video that shows how one person made a camera boom using this design concept. This may allow the most ease of adjustment once constructed and mounted, but these initial steps do not seem trivial, and may require a lot of time and care.
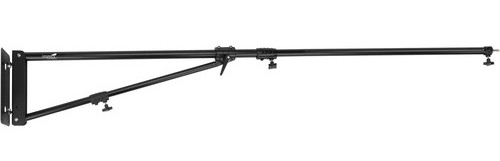
Option 4 might be the simplest and most direct of all. It employs a wall mounted boom arm for camera or lighting equipment. It swivels from left to right by a full 180 degrees, up and down by up to 180 degrees, depending on the design, and extends from a minimum to maximum of between 2.9 to 4 feet, or 3.9 to 7 feet depending on the model, giving you the third dimension for ultimate control of vacuum hood placement. Note that the Impact boom arm has a telescoping triangular support for additional tilt range, whereas less expensive brands such as Neewer do not.
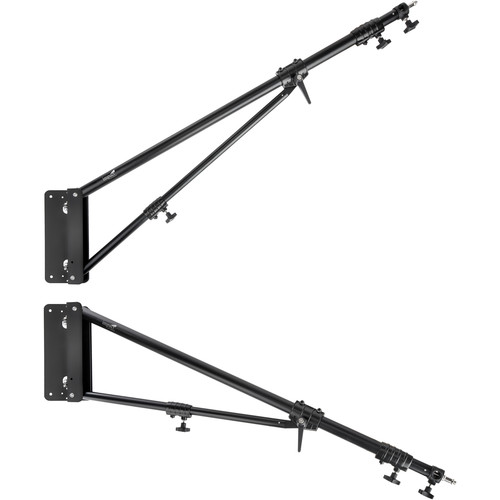
Mounting this arm is as simple as drilling a few holes in the wall, into a stud or into concrete, and screwing the wall bracket to the wall so that it is plumb. You must choose the correct height for the bracket, but remember that you do have vertical adjustment with the boom arm. Also, make sure you place the boom arm the correct distance away from your welding bench, so you can extend the boom arm or retract it to achieve the proper centering of the fume vacuum hood over the welding area.
The boom arm comes with a reversible stud with 1/4 x 20 or 3/8 x 16 male threads, so you could use that to mount the fume vacuum hood to the end of the boom arm. Then you just secure the flexible duct to the arm with zip ties to keep it out of harm's way.
One other enhancement for mounting the vacuum hood could be to employ a ball head, which will allow you to easily adjust the angle of the hood for whatever tilt you use for the boom arm. You might be able to forego this addition by mounting the hood from the side of the arm and then simply swiveling the mounting stud in the end bracket of the extension arm. This would reduce weight and expense, but would place the vacuum hood to one side or the other of the arm, which might limit some placements. Of course, you could switch the hood from one side to the other on the boom end bracket if you don't mind the hassle.
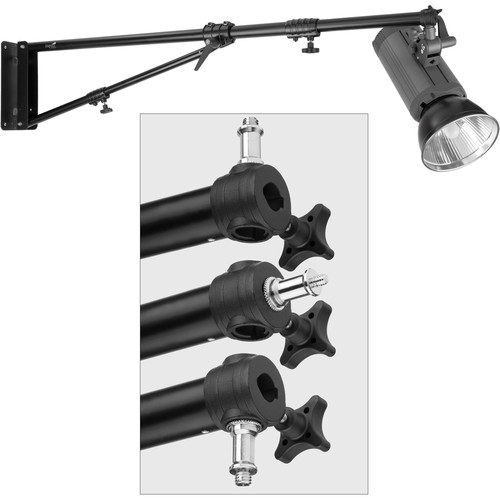
Note that the boom arm extension rod rotates, so you can have the threaded stud project from either side as well. This might allow you to flip the vacuum hood to the other side just by twisting the boom arm extension while rotating the hood back into the down position. I'd have to try this to see if it works with the flexible duct attached.
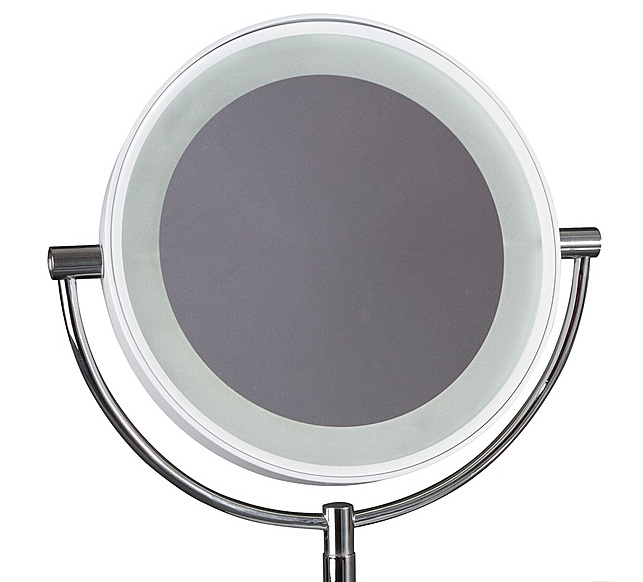
Another way to attach the vacuum hood to the boom arm would use a semi-circular bracket that would attach to both sides of the 12 inch adapter rim. The contact points would act as pivots allowing the 12 inch adapter to swivel, compensating for the tilt of the boom. The contact point with the boom would contribute another pivot point, so the entire vacuum hood assembly could be rotated. This could be fabricated from narrow bar stock bent in a slightly larger radius, with holes drilled for the pivot points. Bolts with wing nuts would allow hand tightening the pivots to preserve your selected angle. The photo shows a makeup mirror mounted that way, but using tubing for the frame rather than bar stock.
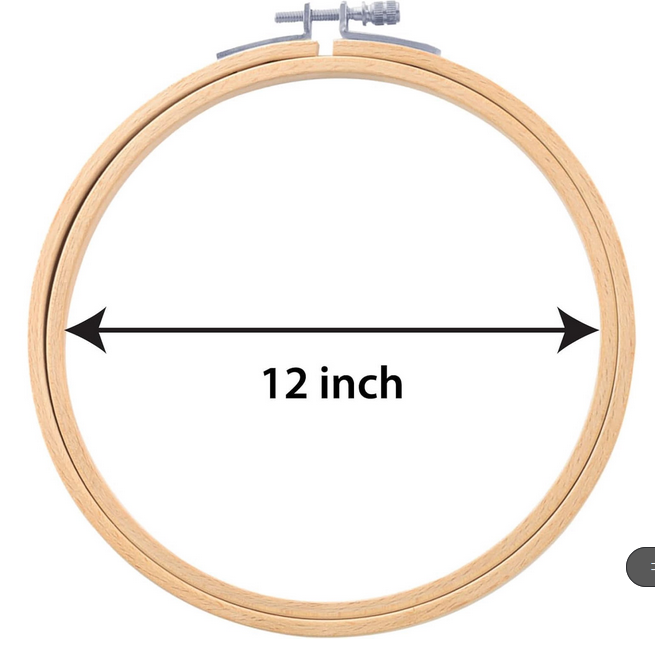
You might even be able to make something like this embroidery hoop work. If it fits around the 12 inch rim of the transition adapter, you could clamp it and use the screw on the clamp as a pivot point on a bracket that would attach to the end of the boom. Better yet, you might be able to use the opposing holes in the end of the boom for the screw clamp and pivot the assembly from there. The boom end already has a thumbscrew clamp to fix the pivot angle.
What you gain with ease of mounting and zero construction effort you might lose with range of movement. The most limiting factor with this system is the extension length, so you might want to buy two of these boom arms, one longer than the other. That way you can switch between them when you need more range. You could even have both set up simultaneously with duplicate vacuum hoods and ducts, connected to a manifold with blast gates for the active hood, but that would be a future expansion when your needs dictate.
I haven't built my own system yet, and will let you know how it turns out. As of the date of this writing, my preference is with Option 4. There are still some issues such as where to mount the duct fan and how to route the duct pipe that haven't yet been settled, as well as where to locate the exhaust port. Those issues will vary with your own shop, so you will ultimately have to solve those problems on your own. However, you can view my setup for ideas that may be adaptable to your situation.